Hey guys! I get asked frequently about how I make my art, and I thought making a tutorial would help some people out. In this thread I will go through some of my tips, tricks and resources that I use. I will also go through the steps I do to make some of my arts. Enjoy and I hope you guys find this helpful Some possible softwares to edit with: Photoshop - the best of the best really. Out of all the ones I've used, Photoshop does produce the best quality images. Trial: http://www.adobe.com/cfusion/tdrc/index.cfm?product=photoshop&loc=en_us Photofiltre 7 - this is my secondary option to PS. Funny enough, it's the one I use the most. It can do the basics and is the programme I have started out with. It's got some really nice built in effects and I've achieved good results with it. It is fairly similar to Photoshop, but it's completely FREE. Download: http://www.photofiltre-studio.com/pf7-en.htm Gimp - Haven't used it personally, but know some people that have. Pretty similar to Photofiltre 7, it's free and it can open PDS files. Download: http://www.gimp.org/
If you need any help using Photoshop or Photofiltre 7, then you can ask me and I'll try my best to explain. However there are plenty of tutorials for these programmes on YouTube so feel free to look around there~
Some possible online sites to edit with: Picmonkey - http://www.picmonkey.com/ Really, really easy to use. It's got some cool effects and filters. Pixlr-o-matic - http://pixlr.com/o-matic/ This one is good for filters only. Sometimes you may want to create your art in PS or something, and then give it a nice filter with this website.
Some tips & tricks: Not sure where to start with this, but here are a few pointers that could help. -Always save your pictures as PNG files, always. It seems to be the best file for better quality images -Seems a bit obvious, but for your arts to look nice the PNG's and textures your using have to be of high quality to start with. VK is probably the best to get the newest PNG's from, but there are plenty of sites out there that have other PNG's -Sharpening the image always seems to work. -Learn where the best resources are. It seems a bit silly, but I'm forever hunting for backgrounds and textures that I can use. -Just play around. With everything. Online or in a programme. Spend some time playing around with different effects and seeing what looks the best. -Don't force yourself to do artwork. I don't know about anyone else, but I seem to produce the best fanarts when I'm really in the mood or have been seriously inspired by something -Always find a source of inspiration
If any of you guys have got anything to add to this, then post it here and I'll add it to the appropriate list. Thank you for reading and good luck with your arts
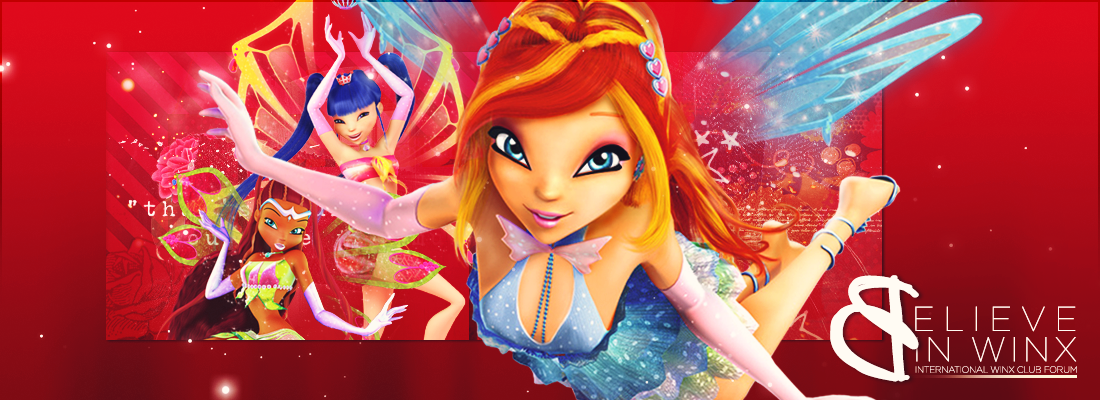
Tutorial #1: Animated Slideshow Signature LEVEL: HARD
I think most of you here know the basics of Photoshop, so I thought I'd jump straight into the medium/hard end Don't worry, I'll do some easier ones too. But today I'll show you how I made this signature (Loxa's current siggy): So let's get into it!
PART ONE: Step one: Open Photoshop and go up to File>New and make the canvas 560 wide and 340 high (560x340)
Step two: Paste in this gradient This will be the base.
Step three: Add some pretty texture. I used this one below, but you could just about use anything that has a lot of detail. You'll notice that this doesn't take up the whole space. Try to centre it so that there is a little border with the gradient on either sides.
Step four: Make the layer you just added to have an opacity of 90%. You can do this by going into the 'Blending Options'
Step five: Add this texture. Go to the 'Blending options' and set the blend mode to 'Lighten'.
Full image:
Step six: Add whatever Winx girl you like. As you've seen, I chose Musa in her Butterflix. I'd make whoever you chose a similar size to what I've made Musa. Now once you've done that, go to Image>Adjustments>Hue/Saturation. Bring the saturation down to about -25. Then go to Image>Adjustments>Brightness/Contrast. Bring the contrast level up to about 80 (or whatever settings suits your chosen character).
Step seven: Add this little polaroid. Then duplicate the layer, flip it horizontally and put it behind the bigger polaroid.
Step eight: Add this section of an image and put it over the polaroid part. (It has been blurred a bit) Go to the 'Blending Options' and select 'Lighten'. Change the opacity to 60%.
Step nine: Duplicate the layer with this texture and bring it in front of everything you've got so far.
This layer:
Go to the 'Blending Options' and put the blending mode on 'Screen'. Change the opacity to 70%.
Step ten (optional): Add some text. On my text, I went to the 'Blending Options' and used 'Stroke' and 'Gradient Overlay'. I made my own gradient. Play around a bit with colours and effects and see what suits your art! Also, add text on the polariod bit with the name of your chosen fairy if you want.
But don't save it just yet!
PART TWO: This second part can be bit tricky and tedious. This is the way I have done it; there may be an faster way out there but I haven't found one yet
Step one: Find a few screenshots of the character you have chosen. You can just google them. Find at least three you like and save them. (I used four screenshots)
Step two: Open your first screenshot. Copy it into your project you have been creating. Go to Edit>Transform>Scale and make your screenshot so it'll fit what you want into the polaroid. (Tip: to do this, temporarily set the opacity as about 10-20% then change it back to 100% once you're happy)
Step three: Once you've got it into the right position, select the layer with the polaroid in it. Press and hold down the 'Quick Selection' tool and select the 'Magic Wand' tool.
To clarify:
Step four: Still on the polaroid layer, select the black area of the polaroid with the 'Magic Wand' tool
Step five: Select the layer with the screenshot and copy this (you can use the keyboard shortcut Ctrl + C) whilst it is selected.
Step six: Paste the area you copied. (Keyboard shortcut: Ctrl + V)
Step seven: You should now have two layers: one with the full screenshot and one with the selected part of the screenshot. Delete the layer with the full screenshot. You should now have the screenshot within the polaroid. Put this layer so it is behind the galaxy layer but in front of the polaroid layer.
Step eight: Now we are going to create the frames for our animation. Make a folder where you can save your frames if you wish. Flatten/Merge the layers of your image (Layer>Flatten Image). Save your image using 'Save As' and name it something like '1'. Save it as a PNG for maximum quality.
Step nine: Undo what you have just done to get the layers back (Edit>Step Backward). Select the layer with the screenshot and use the Motion Blur effect (Filter>Blur>Motion Blur). My settings were Angle=38 and Distance=75 pixels, but 35 pixels should be ideal. You can chose whichever settings you like though.
Step ten: Flatten/Merge your image and then go to 'Save As' and save it as '2' in your folder.
Step eleven: Undo what you've again, and repeat steps eight to ten with your other screenshots. (i.e. open and paste in your next screenshot, use the Magic Wand tool to select the area of the polaroid and copy the part of the screenshot you want, save it, undo it, Motion Blur the screenshot, save it again, undo it...and repeat)
PART THREE: Almost there! By now you should have all your frames made.
Step one: Open a new project on Photoshop (File>New). Go to Window and make sure that 'Animation' is selected.
A bar like this will appear:
Step two: Go to File>Scripts>Load Files into Stack
A box like this will appear:
Step three: Click Browse and select all your frames you've made. Press OK.
Step four: Your frames will now start to load into the animation bar. Once it's done, click the button labelled 'I' in this image Click 'Make Frames from Layers' (NOTE: sometimes you have to reverse the frames. Go to the button labelled 'I' again, click 'Select All Frames', then 'Reverse Frames')
Step five: Change the duration for all the normal screenshots to 0.5 seconds and all the blurred screenshots to 0 seconds. This is the setting I usually use but you can chose otherwise.
Step six: Go to File>Save For Web & Devices. Make sure the file is a GIF file and you can preview it in IE or Chrome if you want. Press Save.
And that is all!
Wow, I didn't think through how many steps were needed. I always tend to make very multi-layered arts, so unfortunately they're all going to be quite long. I'm kinda thinking I jumped in the deep with this one, but I was just really exited to show you guys how I make some of my animations
PLEASE IF YOU'VE GOT ANY QUESTIONS ABOUT THIS TUTORIAL, FEEL FREE TO ASK ME HERE OR PREFERABLY IN PM.
Feel free to post your results in here
Last edited by Winxisawesome on Fri Jan 01, 2016 7:32 am; edited 2 times in total
Excellent well-thought introduction! I can't wait to see what you will produce. I may not be one of those people who would create fanarts herself, but I'm pretty excited to see the amazing tutorials you'll show.
It's very detailed and informative. I can't wait for the tutorials! not that I make any fan art anyways
Winxisawesome Sirenix Fairy
Posts : 2917 Age : 26 Location : outside your window Hobbies : sitting outside your window
Subject: Re: *~*Nessa's Winx Art Tutorials*~* Sat Jul 11, 2015 11:48 am
Flame Melody wrote:
Excellent well-thought introduction! I can't wait to see what you will produce. I may not be one of those people who would create fanarts herself, but I'm pretty excited to see the amazing tutorials you'll show.
WINXCLUBISMYPASSION wrote:
It's very detailed and informative. I can't wait for the tutorials! not that I make any fan art anyways
Thank you for the feedback and kind words!
I've just updated the thread with my first tutorial. Please check it out! I'm a bit worried parts of could be unclear, so ask questions if you need to!
Subject: Re: *~*Nessa's Winx Art Tutorials*~* Sat Jul 11, 2015 3:42 pm
Who would have thought it took all this work?? You did pretty good on the signature and the tutorial; nevertheless you were pretty detailed! Keep it up, I'm sure your tutorials will attract more people!
PumpkinPai Sirenix Fairy
Posts : 4155 Age : 22 Location : Lowee, The Land of White Serenity Hobbies : You can call me Pai. I like to draw, mostly digitally. I like watching anime. I also have the power of Kawaix. XD
Subject: Re: *~*Nessa's Winx Art Tutorials*~* Sun Jul 12, 2015 12:38 pm
Nicely detailed. c: I might get GIMP and Photoshop this weekend.^^ I also would like to thank you for this tutorial. c:
Anyway a lot of beautiful detail. I kind of got lost a bit yes I know I have a simple mind..., any chance you could screen shot the following? Or ignore me that works too - Part 1: Step Seven, Eight and Nine - Part 2: Step Three, Four and Eight
Thanks!
winxclubmagi Sirenix Fairy
Posts : 3234 Age : 20 Location : 10880 malibu point 90265. i will leave the door unlocked Hobbies : crying over cartoons, memes and superheroes
Subject: Re: *~*Nessa's Winx Art Tutorials*~* Wed Jul 15, 2015 11:04 am
hey nessa i was wondering if you know how to create zig zag borders like that one
Winxisawesome Sirenix Fairy
Posts : 2917 Age : 26 Location : outside your window Hobbies : sitting outside your window
Subject: Re: *~*Nessa's Winx Art Tutorials*~* Fri Jul 17, 2015 4:29 am
WINXCLUBISMYPASSION wrote:
OMG! I've been eyeing Loxa's sig for ages
Anyway a lot of beautiful detail. I kind of got lost a bit yes I know I have a simple mind..., any chance you could screen shot the following? Or ignore me that works too - Part 1: Step Seven, Eight and Nine - Part 2: Step Three, Four and Eight
Thanks!
Part 1: Step Seven, Eight and Nine:
Step seven: I'm not entirely sure how to screenshot this one sorry, but I'll try to explain it more in depth xD Save the polaroid that I have posted here, then go to File>Open and it should appear in a new tab up the top. Go into that new tab and copy ad paste it from there. This is the "duplicate layer" button: So press that, then go to Edit>Transform>Flip Horizontal, then make it smaller by pressing Ctrl and T
Step eight: Just copy and paste the image straight into PS, and place it in the bottom right hand corner like so: Go to the 'Blending Options' and select 'Lighten'. Change the opacity to 60%. It should now look like this:
Step nine: Use the duplicate layer button again, and drag it to the very top on top of all the layers. Change the blending options to "Screen" and the opacity to 70% with this:
Part 2: Step Three, Four and Eight:
Step three/four: So It'll look something like this: Now, select the black box with the Magic Wand Tool. ^This little selection box will appear around the area you selected NOTE: the front layer and screenshot I used are invisible in this...
For step eight, I just made a folder in my computer of where I could save all the frames. Go to Layer>Flatten Image to flatten it.
Sorry, I hope that helps, I'm terrible at explaining
winxclubmagi wrote:
hey nessa i was wondering if you know how to create zig zag borders like that one
Unfortunately, I don't think Photoshop has many built-in effects like that, so it's a fairly long process to do something simple like that xD
This video should help:
I haven't tried it myself yet, so let me know how it goes
Thank you guys for the feedback, I'll get a simpler cool one up soon
Winxisawesome Sirenix Fairy
Posts : 2917 Age : 26 Location : outside your window Hobbies : sitting outside your window
Subject: Re: *~*Nessa's Winx Art Tutorials*~* Fri Jul 17, 2015 7:31 am
Step one: Open a new file in Photoshop with the dimensions of 200x500 (widthxheight)
Step two: Copy and paste this background in: This will be our base.
Step three: Since the base is quite plain, add a nice texture to it. Go to the 'Blending Options' and change it to 'Lighten'.
Step four: Make a new layer (Layer>New>Layer). Go to Select>All. Go to Edit>Stroke. Make the width 4px and the colour light grey (or any colour of your choice).
Step five: Now go to Edit>Transform>Scale. Make sure that the button in the middle (Maintain Aspect Ratio button) is clicked, and change boh of the percentages to 98% like I have done.
Step six: Add a Winx girl of your choice. As you've seen I added Musa.
Step seven: Add this texture. Go to the 'Blending Options' and change it to 'Lighten'.
Full Image (if wanted):
(I just used parts of it)
Step eight: (optional) Add some text if you want. I did and just went to the 'Blending Options', used Gradient Overlay and Stroke (with white and 'Overlay' blending option). Just play around until you're happy!
Step nine: Flatten the image (Layer>Flatten Image). Sharpen the image (Filter>Sharpen>Sharpen) if need be.
Step ten: Save the image as a .PNG
And we're done! Hopefully that was easy enough, right?!
Once again, if you've got any questions just ask and post your creations here


 Mon Aug 07, 2023 3:14 pm by


 Enjoy and I hope you guys find this helpful
 Don't worry, I'll do some easier ones too.


